Hail storms can pepper a vehicle with dozens—or hundreds—of small dings across the hood, roof, and trunk. With the right method, you can complete hail dent repair at home using paintless dent repair techniques and cost-effective tools. This guide walks you through safe, paintless dent removal on large volumes of car dents, from assessment and mapping to glue pulling, PDR pushing, blending, and final inspection.
Damage Assessment and Safety: When DIY Hail Repair Makes Sense
Before you begin DIY dent repair, confirm that the panel surfaces and paint are suitable for paintless dent repair (PDR). Hail damage is an ideal candidate when dents are shallow, round, and the clearcoat is intact.
- What to tackle at home:
- Uniform hail damage with small, round dings and no cracked paint.
- Steel panels on roofs, hoods, and trunk lids that have accessible backing for body panel repair.
- Light to moderate car dents (typically under a nickel in diameter) distributed across a panel.
- When to call a pro dent repair service or body shop:
- Sharp creases, stretched metal, or cracked/chipped paint that require conventional auto body repair and refinishing rather than paintless dent removal.
- Complex aluminum hood repair where access is limited and the panel is prone to “oil canning.” Aluminum panels are repairable with PDR, but experience matters; consider professional PDR for the best repair results.
- Safety-critical areas (near airbag sensors, structural components) or severe car damage from secondary impacts.
- Cost and time expectations:
- DIY hail dent repair can be an effective budget dent repair strategy versus full car bodywork at a body shop, especially when you already own a dent repair kit and dent repair tools. However, factor in your time for mapping, the dent removal process, and careful finishing.
- Dent repair cost through professional PDR varies by panel count and severity. If your step-by-step repair reveals difficult areas, it’s often cheaper to stop early and let a specialist—such as experienced regional providers like Gemstate PDR— finish than to overwork metal.
Safety notes:
- Disconnect the battery when removing trim near the airbag wiring.
- Wear eye protection when pulling dents and blending.
- Use heat cautiously on repaints; thinner or non-factory clear may soften quickly.
Tools, Materials, and Workspace Setup for High-Volume Dent Removal
Essential dent repair tools and materials:
- Lighting and reflection
- PDR line board or LED reflection light to read lows/highs.
- Shade canopy or indoor bay lighting to eliminate glare on the car exterior repair.
- Glue-pulling setup
- Hot glue gun, PDR glue sticks suited to your climate (firmer for hot regions like Dallas, Texas), alcohol release spray, and microfiber towels.
- Variety of glue tabs (round and oval) to match different dings.
- Dent puller options: mini lifter for controlled pulls and a slide hammer for stubborn areas; each dent removal tool has its place when pulling dents.
- PDR pushing and blending
- PDR rods and whale tails with interchangeable tips (nylon, polished steel, dent eraser-style soft tips).
- Knockdowns and hammers for precision tapping.
- Blending hammer to soften micro-lows and harmonize orange peel.
- Panel access and protection
- Trim tools, panel wedges, protective tape, fender covers, and soft blankets.
- Heat gun or induction heater (use cautiously) for cold panels or aluminum.
- Consumables and organization
- Grease pencils/dry-erase markers for mapping.
- Isopropyl alcohol for glue release and surface prep.
- Repair kit caddy, magnetic trays, and a panel checklist.
Tool sourcing and education:
- Many DIYers start with an entry dent repair kit or a repair kit from Amazon; search Amazon dent tools with solid reviews. Watch a dent removal tutorial on YouTube by creators like ChrisFix, CashedOutCars, MasterOfNone, Samcrac, Stoney Ridge Farmer, and Anderson’s Garage for a practical tool overview.
- For deeper training, look to professional PDR resources, including Real World PDR Training, Excel Dent Removal, Legacy Dent Co., Elevation Dent Co., and Dent Discount – PDR Training. Their step-by-step repair insights on removing dents translate well to large-scale hail damage projects.
Surface Prep and Dent Mapping: Organizing Hundreds of Dents Efficiently
Efficient paintless dent repair on hail-damaged cars starts with disciplined prep and planning.
- Wash and decontaminate:
- Thoroughly wash the vehicle and clay the panels to remove sap, rail dust, and overspray. Clean surfaces improve glue pulling, adhesion, and reading accuracy.
- Degrease and inspect:
- Wipe panels with isopropyl alcohol to remove waxes. Under your PDR light, scan each body panel and circle every ding. Note any door dings and larger car dents that differ from hail strikes.
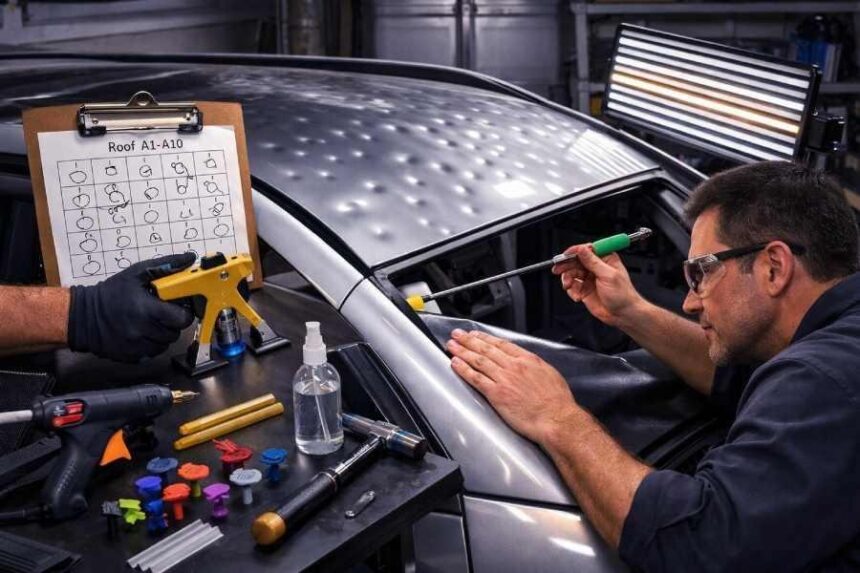
- Create a dent map:
- Divide each panel into a grid. Number of dents within each grid square (e.g., Roof A1–A10). Photograph before starting to track repair results.
- Mark “no-glue” zones (repaints, thin edges) and flag tougher areas like braces or double skins that may require from-behind pushing.
- Sequence your workflow:
- Tackle one body panel repair section at a time. Begin with the roof, then hood, then trunk; finish with upper doors and rails. Work from the outer edges to the center to maintain panel tension.
- On aluminum hood repair, warm the panel slightly to reduce cracking risk and improve metal movement.
Step-by-Step Repair and Finishing
Glue Pulling: Controlled Lifts for Uniform Hail Dents
Glue pulling is often the fastest first pass for DIY dent repair across hundreds of shallow dings.
- Step-by-step:
- Clean the ding with alcohol; ensure it’s dry.
- Select a tab slightly smaller than the dent. Apply a thin, even glue bead.
- Place the tab, hold lightly for 2–3 seconds; allow glue to set (longer in cold weather).
- Use a mini lifter dent puller for precision; squeeze gently to lift the dent. For stubborn dings on thicker metal, a slide hammer can help, but avoid over-pulling.
- Release with alcohol; remove glue. Use a knockdown to tap down any created high spots.
- Reassess under your reflection light and repeat. Many small cycles beat one aggressive pull.
- Tips for a better dent removal process:
- Keep the tab face and panel impeccably clean for consistent pulling dents.
- Vary tab shapes for oblong dings. On edges and bodylines, use softer lifts and more knockdown.
- In hot climates like Dallas, Texas, choose high-temp glue; in cold, pre-warm the panel lightly.
PDR Pushing and Blending: Refinement to Factory Contours
After glue pulling, many small lows remain. PDR pushing completes the shape, while blending restores texture.
- Access and leverage:
- Remove trim and liners to reach the backside. For roof rails and braced sections, use whale tails. For open spans, use longer rods with a soft dent eraser tip first, then switch to sharper tips for precision.
- Protect edges and paint with tape. Use controlled, small pushes following the reflection lines—micro-movements matter when repairing dents at volume.
- Blending techniques:
- Lightly tap down crowns and highs with a polished knockdown; constantly read the panel with your line board.
- Use a blending hammer to feather micro-lows and match orange peel, especially after multiple cycles of removing dents. This finishing step is where professional PDR stands out.
- Metal considerations:
- Steel panels respond predictably. For aluminum hood repair, use smaller, more frequent pushes and consider mild panel warmth. Overworking aluminum leads to “mushiness” and uneven spring-back.
Finishing, Inspection, and Aftercare: Achieving a Factory-Like Finish
Finalize your paintless dent repair with systematic checks to ensure uniformity across all treated panels.
- Visual and tactile inspection:
- Under varied lighting (LED line board, diffused overheads, natural light), scan every grid square on your dent map. Sight along the panel at shallow angles. Lightly glide a clean microfiber to feel remaining low/high spots.
- Compare before/after photos and mark any remaining dings for touch-up cycles with the dent puller or PDR rod.
- Surface refinement:
- If glue residue remains, remove it with alcohol. Where necessary, perform ultra-light wet sanding only on dust nibs or minor clear imperfections, then polish. Avoid cutting factory orange peel beyond the surrounding texture; the goal is car exterior repair that looks OEM.
- Reassembly and quality control:
- Reinstall liners and trim, torque fasteners properly, and verify all clips are seated. Check functional items (lights, washer nozzles, sunroof drains).
- Conduct a final reflection-light pass panel by panel; enlist a second set of eyes if possible.
- Aftercare and maintenance:
- Wait 24 hours before washing to let any residual solvents flash off. Use pH-neutral soap and soft mitts for ongoing car maintenance.
- Park under cover during hail season where possible. Consider a hail blanket or cover to prevent future hail damage.
- Keep a compact dent repair kit in your garage for future door dings and minor car dents.
- Further learning and references:
- On YouTube, CashedOutCars and ChrisFix offer approachable step-by-step repair videos, while MasterOfNone, Stoney Ridge Farmer, Samcrac, and Anderson’s Garage share practical, real-world auto repair scenarios that complement PDR skills.
For structured training and advanced techniques in paintless dent removal, explore Real World PDR Training and Dent Discount – PDR Training. Following professionals who post detailed tool overview breakdowns will help you select the right dent removal tool for each situation and improve repair results over time.